Wednesday, 7 November 2018

'This Way' or 'How to create a multi-plate linocut'

This post shows the development of my new multi-plate linocut 'This Way', which I created for the Northern Collective exhibition in Keswick. The image is of a stone stile, small gate and footpath marker which I came across on a walk in the Elterwater area of the Lake District.

Why choose multi-plate over the reduction process? It's a fair question to ask and I do use both techniques, depending on the project and image. Both methods have their relative advantages and disadvantages.

For me the benefits of multi-plate are:
  • you can come back and explore different colour ways
  • you can make the most of overlap colours
  • you can use the plates again in other projects
  • if one plate goes wrong, you can re-do it!
Some useful tips...It's critical to plan your plates and use of tones, before you start! Also you need to transfer your image to each plate from the master image with care and accuracy. My master image was on tracing paper, as I reversed my sketch because I wanted to reflect the real place as closely as possible. I like to test the plates in a quick, often wet-on-wet prototype poof, just to check everything is fundamentally working, before playing with colours.

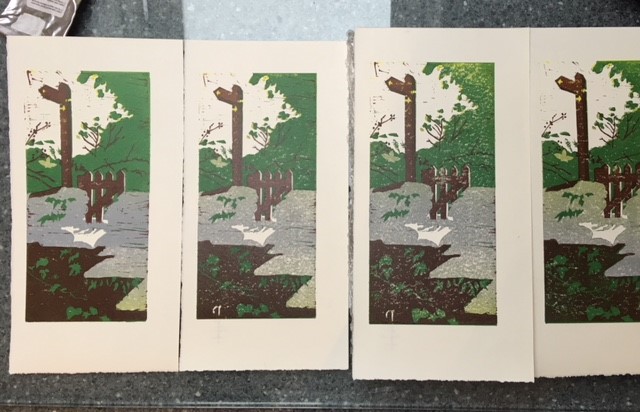
'This Way' is made up of four plates. In the prototype you can see how each one of the plates builds to create the image:


After colour 1 - rough proof

After colour 2 - rough proof

After colour 3 - rough proof

Final rough proof - with all 4 plates

This proof allowed me to adjust tones and make different decisions for the next stage of the development of the print. I wanted the colours to be more vibrant and was trying to create a sense of light and shade, as well as distance, in the linocut, so I tweaked the plates a little more, before printing the edition.


I printed the final edition of ten, at Hot Bed Press in Salford using Intaglio oil-based inks on the wonderful old Albion press.

The final colour is a deep grey / blue

'This Way' edition drying on the racks

 
A good example of the benefits of multi-plate can be seen in 'Halo' and 'Regenerating' - both linocuts use the same set of three plates, but the colour choices and different paper stock, transform them:

'Halo' multi-plate linocut

'Regenerating' multi-plate linocut

To see more of my work, please check out my website: www.carolynmurphy.co.uk where you will also find an online Shop with currently available work. Thanks!


Friday, 19 October 2018

More about Macmillan and 'Serenity' cards

On October 17th, I spoke briefly at a Macmillan volunteers and fundraisers event at UKFast in Manchester, with Debbie Smith, the Macmillan Cancer Support Information Centre Manager at Wythenshawe Hospital. I explained all the support I have received from the Centre over the last two years and the difference it has made to me. I almost managed not to get too emotional!

Debbie talked about her role, the people she supports and how the new extension will help.

We also showed the A1 sized 'Serenity' linocut I was commissioned to create for the new extension to the Macmillan Centre at Wythenshawe Hospital. It's now framed and on the wall.

Macmillan Centre Manager Debbie Smith (left) and Carolyn Murphy with 'Serenity' 

Carolyn Murphy with her reduction linocut 'Serenity'


I donated a second original linocut from the edition, which is now in the Macmillan family room in Wythenshawe Hospital.

Now cards of 'Serenity' and A3 reproductions are available to buy online via the charity Love From The Artist. All profits go directly to the Macmillan Information Centre at Wythenshawe Hospital.

'Serenity' cards now for sale online

2 designs from 'Serenity' are available - this one is 'Balloons'


You can follow the creation of my first linocut commission on this blog by following this link to the first in a series of blog posts I wrote at the time. I was also delighted to be featured in a blog post on the 'Probably Prints' site.

To learn more about my work, please check out my website www.carolynmurphy.co.uk where you'll find my gallery, online shop and links to my social media.

Monday, 15 October 2018

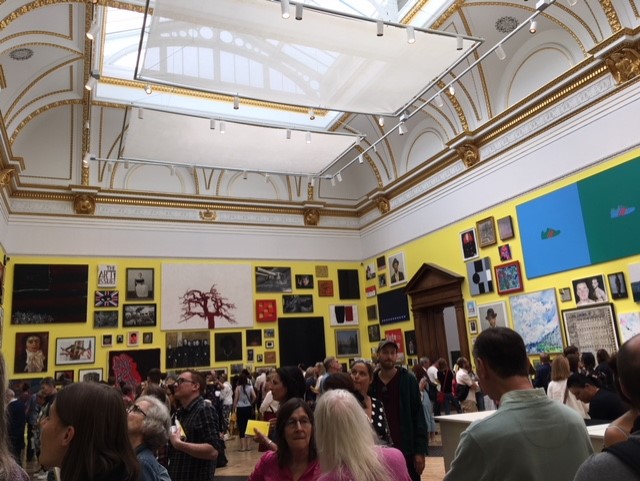
In the 'Northern Collective' Exhibition in Keswick

I'm very excited to be part of this large group exhibition, which has just opened at the Theatre by the Lake in Keswick. The sixteen artists involved are united by spending time drawing together in the Lake District and various venues across the North West. Artist Geraldine Walkington, from Kendal, organised our first group exhibition.

On Tuesday we delivered work to the Circle Gallery promptly at 10am, for it to be hung by the team at the Theatre. The exhibition opened to the public the following day & runs from 10 October to Sunday 11 November. We held a private view on Sunday, which was my first chance to see all the work on the walls. I'd highly recommend popping in, if you are in the area. The Theatre is in a fantastic location, right by Derwent Water, with a café with views to the Lake - ideal for a lunch stop! The exhibition itself is really varied in media and style: including paintings, printmaking, textile art and assemblage.

I decided to include my large 'Serenity' linocut, which was commissioned by Macmillan, plus 3 smaller linocuts - 2 with a link to the Lake District. 'Over Morecambe Bay' is based on a sketch I did whilst up at Grange on one of Geraldine's Drawing Days, whilst 'This Way' is a linocut of a Lake District stile and footpath sign.

I've included in this blog post more detailed pictures of the whole exhibition, so that you can get an idea of the work on show and the artists exhibiting as the Northern Collective, even if you're not able to make the journey to Keswick. Images of the Preview are on my website. I hope you enjoy a look around, in person or online!

Artworks by Colin Binns in the exhibition

Textile art by Jaini Hadley on show

  
Paintings by Geraldine Walkington in the show


Work by Gerry Hickson

Assemblages by Petra Hartmann

Linocuts by Carolyn Murphy
  
Mixed media artworks by Ann Marie Foster

Paintings by Janette Phillips
Printmaking artworks by Lynn Pascoe
Artworks by Barbra Cropper
Katie Bentley paintings in the show
Julie Emary's work
Angie Mitchell linocuts in the exhibition
Priscilla Edwards & Marian Jazmik's work
Christine Sandford's artworks

After the exhibition preview, we had time for a short stroll near Derwent Water as the sunlight was fading. It was a glorious autumnal drive to Keswick and back home!


To see more of my work, please check out my website: www.carolynmurphy.co.uk where you will also find an online Shop with currently available work. Thanks!

Thursday, 4 October 2018

Hanging the Old Parsonage exhibition

Our 2018 'Spectrum' exhibition in Gallery 1 at the Old Parsonage in Didsbury is a challenge to hang, partly because the ceiling is so high and the step ladders are huge, but also because the hanging system ensures that all work is hung by fishing wire from a high level picture rail, so that there are no nails or screws into the walls.

Work hung on strong, fine fishing wire (40lbs +)

Last time I was at the Old Parsonage, back in 2015, my work was in Gallery 2, which is smaller and has a much lower ceiling. Then I was working with local artist Malcolm Allum to hang the room. Malcolm had a tried and tested system to get all the work at eye level.

This year, with Anne Mackinnon, Cate Gibson and myself, we had to refine the method to hang Anne's work on 3 levels and Cate's and my work on a single or double level. I'm logging here how we did it, so we can all refer to it in future. It may be useful for you too. Fingers crossed. I've outlined the steps below:

  1. Start by measure the distance from the bottom of the picture hook to the centre point you want for your eye-level pictures.
  2. Run a piece of masking tape across the full width of a trestle table so that it is straight and even. Declare and mark one side of this as your 'centre line'.
  3. Attach a pen with a clip along the top of a chair, using masking tape and fishing line, so that it can't move and you can still access the clip end
  4. Position the chair carefully so that the distance between the centre line on the table and the inside of the clip of the pen measure exactly the same distance you decided on in point 1. Don't move the chair!
  5. Take the first work you want to hang and put it on the table, measuring it carefully so that the centre of the work is aligned to the centre line.
  6. Attach the fishing wire to one of the 'D' ring fittings on the artwork and run the wire out to the pen, through the pen clip and back to attach to the other 'D' ring fitting on the artwork
  7. Hang the artwork by hooking the fishing wire over the picture hook on the top rail. It will hang at eye level.
  8. Continue with all the other work
  9. To add higher rows, repeat this exercise but re-measure a new higher or lower centre point for step one and move the chair distance accordingly before continuing.
  10. If you happen to be out by a tiny amount on any pictures, we decided to add an extra twist or two to the wire when hanging on the top picture hooks. Not scientific this bit, but it did the trick!
Measuring the centre of an artwork to place it on the centre line 

Pen attached to the chair, artwork on the centre line

Hanging work on different levels with high ladders

We managed to get our work level and looking professional with very little effort. We'll be using 'Malcolm's system' as we called it again!!

To learn more about my work, please check out my website www.carolynmurphy.co.uk where you'll find my gallery, online shop and links to my social media.

Cracked it!

Thursday, 27 September 2018

Exhibition Inspiration

This year, apart from the fabulous exhibitions I've been to alongside my Printmaking course at Wrexham, I've also really enjoyed getting to the Royal Academy Summer Exhibition, the Terracotta Warriors exhibition in Liverpool, as well as Salts Mill in Saltaire, Bradford to see the David Hockney exhibition 'The Arrival of Spring'. I also really loved this year's Printfest in Ulverston, Cumbria. I've included a few pictures here to act as a reminder and ongoing inspiration.

Salts Mill digital works by David Hockney

Salts Mill - a huge fax print by David Hockney, if memory serves me!

RA Summer exhibition


Summer Exhibition - Woodblock print by Grayson Perry 

Neil Bousfield print commemorating WW1 at the Summer Exhibition

Anish Kapoor RA - work outside the Summer Exhibition 

Terracotta Warrior

Terracotta Warriors in Liverpool

Jason Hicklin etching at Printfest

Gail Mason - winner of the Visitors' Choice at Printfest - with her screenprints

Gail Brodholt's stand at Printfest - Printmaker of the Year 2018

To see my own work, please check out my website: www.carolynmurphy.co.uk where you will also find an online Shop with currently available work. Thanks!
Tuesday, 11 September 2018

Macmillan Linocut Workshop

Yesterday I had the pleasure of getting the Macmillan Craft & Chat group at Wythenshawe Hospital into some linocut printmaking. Linda runs weekly sessions on a Monday morning and she had asked me to show the group what's involved.

Two hours is a fairly short time for linocutting, so I decided to keep the lino pieces small - just 7.5cm squares and limit the number of ink colours. The Craft & Chat regulars, as you'd expect are a creative and lively bunch, so it didn't take them long to get the hang of things, following a short demo!

The results were impressive and you can see the care and attention going in to the cutting. I definitely got the impression that everyone enjoyed trying something new and getting just a little bit messy!


To see more of my work, please check out my website: www.carolynmurphy.co.uk where you will also find an online Shop with currently available work. Thanks!


Friday, 7 September 2018

'Manchester Old & New III' or 'Why choose Easy Cut Vinyl over Traditional Lino?'

It's only taken me about three years to finish the little set of three 'Manchester Old & New' mini linocuts that I originally intended to create.  Manchester has changed quite a lot in the meantime!

This year I added the last one to the series:

First proof of 'Manchester Old & New III'

This linocut complements numbers one and two, shown below:

'Manchester Old & New II' (on the left) and 'Manchester Old & New I'

For the whole set I chose to use 'Easy Cut Vinyl'. I buy the type I use online from Artesaver. You can see the plate during and at the end of cutting:

Part-way through cutting - with marker pen clearly visible on the easy cut vinyl plate

The finished 15cm x 5 cm plate with cutters
I know some people don't like the character of Japanese vinyl or easy cut vinyl at all. In the dark grey, it can be tricky to see the pencil marks you have transferred to the plate too. I tend to use a marker pen to fix the lines and get them to show up more easily before I start cutting. Some say it lacks 'soul'. It's certainly less green than traditional lino, which is made from clay and linseed oil.

The feel of the vinyl is certainly different and pieces of cut lino do not 'ping' out, as they would with traditional lino. You have to finish the cut and allow the tools to rise to the surface. For me, it has it's place and sometimes I chose traditional lino and other times I choose easy cut lino, depending on the project. For reduction linocuts, for example, I'm more likely to use traditional lino, as the process is a one-off and the lino is finished with at the end.

Here I've summarised some of the advantages I find in the easy cut vinyl I use:
It's robust and does not deteriorate - so good for longer editions or returning to a plate later
  • Plates can de cleaned in washing up water
  • The very first print comes off clean and crisp
  • You can achieve fine detail, as well as you can with traditional lino
  • There is no hessian backing to release small fibres
  • It's probably slightly cheaper and comes in a range of sizes
  • It's easier to cut, especially in the cold
To see more of my work, please check out my website: www.carolynmurphy.co.uk where you will also find an online Shop with currently available work. Thanks!