Saturday, 27 June 2020

Repeat printing

There seems to me to be something quite magical about repeat printing, whether on paper or on fabric. I first had a go many years ago on a course at Hot Bed Press, taught by Kiran Williams. We screen printed onto textiles and created a basic repeat design on calico, I believe, and created a tote bag from scratch. 

Since then I've come back to repeat printing on a number of occasions, exploring printing onto fabric, as well as the challenges of making the repeat plates themselves. Initially lino plates ended up strangely shaped, but worked well, before I then took the design back to a regular shaped plate. Here are some of my more and less successful efforts.

This tiny daisy design still one of my favourites. Here it's printed onto cartridge paper - the image is made up of 4 impressions.

Daisies on paper

Daisies on cotton fabric

Daisies in the hand-made signage I used at the North Wales Print Fair


Geometric tile formats work really well in my experience - and looked good on a fabric sampler.


The best solution I found for the 'ink' was actually acrylic paint and textile medium applied with a sponge roller. 

Who would be mad enough to try hand-printed Christmas wrapping paper? My top tip is start in July! Here's the plate design during the cutting process.


Starting the process

About two-thirds there!

The finished plate

I tested the design part way through with a proof, before continuing the final cutting. Here you can see the proof in red and the final design, printed in blue and silver water-based ink on a brown kraft paper roll. I'm pleased to say I did use it to wrap presents at Christmas!


I've also experimented with alternative approaches using 'A Field Guide to Fabric Design' by Kimberly Kight as my guide. Two of my favourites are below. The first one, based on an apple and apple leaf design has windy swirls from the lino. I printed this one onto old wallpaper and used it to cover a little notebook. 


Printed onto wallpaper

The final design I've included here has flower motifs, including the poppy. You can see the plate as well as the inking up process. I printed this design onto paper with oil-based ink.


In each instance I created the repeat pattern manually using tracing paper, pencil, scissors / craft knife and sellotape. It's immensely satisfying when it works and you can't see the join! Kimberly's book includes digital approaches, which I'm yet to experiment with.

To learn more about my work, please check out my website www.carolynmurphy.co.uk where you'll find my gallery, online shop and links to my social media.

Saturday, 20 June 2020

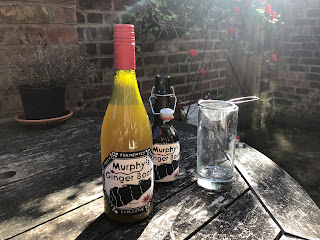
Labels for home-made ginger beer?

Have you ever thought of using linocut to create product labels? It had been on my mind for a while. I had home-made ginger beer in the fridge, in plain wine bottles, so I decided to have a go!

All just for fun, using 1 plate - and 2 ink colours, I decided on the name 'Murphy's Ginger Boom' - and here are my labels. 

Printed labels drying in the studio


Trimmed labels ready to go!

Yes, the fresh, live, natural, fermented product lived up to its name - and the label claims - and proved fairly explosive on occasions over the summer. Delicious and refreshing too. If you haven't tried it, I'd whole-heartedly recommend making your own old-fashioned fermented ginger beer - and the labels! 

On the bottles

Safest to open outdoors... delicious

To learn more about my work, please check out my website www.carolynmurphy.co.uk where you'll find my gallery, online shop and links to my social media.

Saturday, 23 May 2020

Experiments with embossing

I've been planning to experiment with embossing ever since I got my Hawthorn printing press - but have not had the time. At last, Covid-19 brought lots of other activities to a stop and I decided to have a play.

I chose a very simple and small design, so that I could learn faster. The first design is based on the ivy climbing up the wall in our back yard. I've included here pictures of the ivy, the plate and the emboss itself. I kept the cutting bold and the contrasts strong. You can see the results here - just about!

My starting point


I used damp etching paper to create the emboss. After the ivy design, which I felt had been fairly successful, I tried an oak leaf, following a similar approach.


I then had a go at experimenting with adding colour - using oil based-in diluted with white spirit to reach a watercolour consistency, painted onto the plate with a fine brush. The colour transferred onto the damp paper, initially lightly, then more strongly as I built up the colour.


I particularly liked the more subtle examples and the blind emboss (no ink at all). I'm planning to come back to explore this further as a 2 part process - adding the emboss to a dampened oil-based print.

To learn more about my work, please check out my website www.carolynmurphy.co.uk where you'll find my gallery, online shop and links to my social media.

Friday, 24 April 2020

Drypoint exploration

Drypoint is an intaglio printmaking process, which means the ink is printed from the depths of the plate - the areas cut away, rather than the surface. In that sense it's like etching - except that with drypoint you scratch directly into the plate, rather than using acid to bite the surface.

The lines created with drypoint are distinctive, because the ink is captured within the 'burr', the edge of the cut line. It is possible to use metal or perspex plates. In either instance the plats have a shorter life - because each printing serves to flatten the plate.

Enough of the background! Here are a couple of examples. To familiarise myself with my new Hawthorn etching press, I created a small drypoint image of Pittenweem on the Fife coast of Scotland. It's an atmospheric, beautiful fishing village - with cottages hiding from the sea down narrow alleys called 'wynds' which often connect to streets on other levels. My husbands family spent many holiday in the cottage on the right. It has been wonderful to revisit this beautiful area with him.

Test print - Pittenweem drypoint (perspex plate)

This image started as this little sketch, below:


Sometimes, I find I use drypoint to test a planned composition. This is a drypoint which I created as a little study for 'Above Ullswater' to see if I like the structure. I then went on to explore how to create this in a linocut. You can see more about this process in my blog on the topic here.

Initial drypoint test plate for 'Above Ullswater'

To learn more about my work, please check out my website www.carolynmurphy.co.uk where you'll find my gallery, online shop and links to my social media.

Wednesday, 11 December 2019

A visit to Durer's House

While visiting good friends in Nuremberg, I was lucky enough to visit the house of Albrecht Durer in the atmospheric old town.  There is no original Durer work there, but it is a fascinating and beautifully preserved burgher house from the fifteenth century and the museum tells the story of Durer well. 

Albrecht Durer's house (on the right)

Inside, the highlight for me was the 'historical printing demonstration'. 


Inking up

Nobody is quite certain of the design of the Gutenberg press, but back in 1971 a working reconstruction was created based on a drawing by Durer. Today it's used for printing demonstrations and I was lucky enough to 'help' by putting my back into pulling a print of Emperor Maximilian I of Habsburg, who visited Nuremberg in 1512, thanks to this lovely printmaker.

Inserting the arm

The reconstructed press ready to go

The printed image revealed

Inside the workshop

Carolyn with the printed poster of Maximilian

It was great fun and added to my knowledge and my day!

To learn more about my work, please check out my website www.carolynmurphy.co.uk where you'll find my gallery, online shop and links to my social media.

Sunday, 18 August 2019

Cutting Edge Linocuts

It's a rare treat to see so many Grosvenor School prints in one place, so I visited Dulwich Picture Gallery in London to see 'Cutting Edge - Modernist British Printmaking' exhibition this month. The Grosvenor School of Modern Art was a private art school in London founded in 1925. 

I am a big fan of the Grosvenor School printmakers and I was not disappointed! The exhibition was large and I bought the book, to take away and study more at my leisure.


Claude Flight taught at the Grosvenor School and he pioneered, popularised and promoted linocut printmaking, bringing affordable art to the masses and showed the versatility of this 'new' linoleum material. Students included Sybil Andrews, Cyril Power, Lill Tschudi and Ethel Spowers. 

'Speed', linocut by Claude Flight 

Here are just a few more images to act as a reminder for me - and to share with you. They show the wonderful movement, excitement and vibrant colours, typical of these modern printmakers. 

'The Merry-Go-Round', linocut by Cyril Power

'Concert Hall', linocut by Sybil Andrews

'The Eight', linocut by Cyril Power

'In Full Cry', linocut by Sybil Andrews

'Wet Afternoon', linocut by Ethel Spowers

It was an inspiring visit to a lovely gallery. I could have stayed for several weeks!


Saturday, 17 August 2019

A Big Treat

I promised myself a big treat and it's here - and very heavy!

Special delivery - one press

You can see the size of the delivery, which somehow my husband managed to get into the house. This is my new Hawthorn etching press, which is now in my studio, up two flights of stairs (don't ask!)

The heaviest bit at the bottom of the stairs!

Assembling the parts

Pristine - on its stand

Thank you to everyone who helped; whether that's helping me to buy it or helping to get it up to the top of the house. I ran some test squares to get it printing lino evenly and then printed etchings of Malaga, as gifts for good friends on our trip in September 2019.  That's a whole different story and blog post!

First test squares

To learn more about my work, please check out my website www.carolynmurphy.co.uk where you'll find my gallery, online shop and links to my social media.